These materials were prepared for the March 2018 editing workshops.
Getting started
-
- Download your assigned file from our draft index page (on a PC, you’ll right click on link to file, and choose Save link as…), saving it on your laptop, a USB drive or to the cloud (not to a lab computer or other stationary machine). Note that if you double-click on this file once it’s saved locally, it will launch in a browser by default. That’s not what we want, but rather to edit it oXygen.
- Access oXygen. The oXygen XML editor is available in the Virtual Lab in MyWings, which uses the Citrix Receiver client to let your local machine communicate with the software on the server. However, when you go in through MyWings > Virtual Lab, by default the “light” version of Citrix Receiver will launch. This “light” version runs in the browser, not on your machine itself, and it can sometimes be impossible to access your local file system.Therefore, this is what we do:
- Download the full version of Citrix Receiver from the Citrix website: https://www.citrix.com/products/receiver/
- Double click on the downloaded file to run the installer, and say yes to any questions it asks you.
- Once it is installed, click on the Citrix Receiver icon in the task bar of your computer (if you’re using Windows) or launch Citrix Receiver from the application menu
- When it prompts you to add an account, enter this server address: vlab.unf.edu
- It will then prompt you for your network credentials (N# and password)
- Once you’re in, the first time you will need to click on the “+” sign to expand the list of applications, and then choose oXygen.Note: If you have done this on your own machine, you should be able to just start with Step 3 above the next time you want to open the application. You shouldn’t have to do Step 4 again, though you may have to do Step 5. Step 6 should not have to be repeated.Also, if you are on your own machine, when you are done working, (after saving) just close oXygen itself, not your xml document. The next time you launch oXygen, your XML file should be open by default, and you won’t have to browse for it on your machine.
3. Open your assigned file. To do so, you need to browse your local machine, following this path: This PC > C$ > Users > YOUR NAME (or the name of your user account on your computer) > Documents (or wherever you put your file).
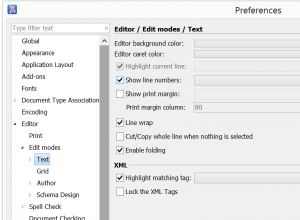
4. Turn on Line Wrap in oXygen. This image shows how to do so (Options > Preferences > Editor (click on little triangle to expand) > Edit modes (click again to expand) > Text):
5. Complete the TEI Header with your name, in the place indicated here:
 <respStmt>
    <resp>Transcription, edition, and encoding</resp>
    <name>Your name here</name>
 </respStmt>
5. Transcribe and encode your file in TEI-XML, according to the Guidelines/Element Reference for Transcribing and Encoding below. You can access the image files on our index page.
6. Validate your file, by clicking the red check mark icon (![]() ), or pressing ctrl + shift + v on a PC. If the red check mark icon isn’t visible, you can select Window > Configure Toolbars, and make sure that the Validate toolbar is checked.
), or pressing ctrl + shift + v on a PC. If the red check mark icon isn’t visible, you can select Window > Configure Toolbars, and make sure that the Validate toolbar is checked.
Note that following validation error, which is common, generally means there is an opening tag of some sort without a matching end tag, or vice versa (not necessarily <p>, as the error message suggests):

7. Preview your file (optional). You can preview your file by clicking on the wrench icon at the top, select TEI P5 XHTML, and clicking “apply associated”. This invokes a default transformation, not our custom transformation, so your file will not display at it will eventually on the server. All values within a <choice> element, for instance, will display.
8. When your transcribed, encoded, and validated file is complete (or when you need help), email it to clayton.mccarl@gmail.com. Once you have emailed your file, you should make no changes in your copy, as it will at that point be obsolete.
Guidelines/Element Reference for Transcribing and Encoding
Criteria for transcription
For a complete articulation of our approach to the project, see our Statement of Editorial Approach. In general, we are going to transcribe the text as we see it on the page, and use the <choice> element to provide alternative readings of spelling or punctuation we don’t deem to be standard today (we will preserve, however, spelling that affects the pronunciation of the text).
Element reference for encoding
I. Representing the manuscript in XML
A. Structural elements
<pb n="1" facs="../images/ew_a1_342_001.jpg"/>
Page break. The value of the attribute n should be the page number. If there is no explicit pagination in the document, you can impose it here, numbering sequentially from 1. The value of the attribute facs should be filename of the corresponding image. This has already been configured for the for page in your file. You should copy, paste and modify that first <pb> tag for subsequent page breaks.
<p></p>
encloses a paragraph. Please put these elements on their own lines, as follows:
<p>
   This is the text of a paragraph.
</p>
<lb/>
marks the place where a line break occurs in the transcription. When a word is divided across the line, we use attribute break to indicate this:
<lb break="no"/>.
For instance:
<p>
   This document has several<lb/>
   lines of text. Most lines end<lb/>
   neatly at the end of a word,<lb/> but this line quite stubborn<lb break="no"/>
   ly does not.<lb/>
</p>
If stubbornly were hyphenated in the original, you would not need to transcribe here the hyphen.
<cb/>
marks the beginning of a column on a page that has more than one column. See the example on this page: http://www.tei-c.org/release/doc/tei-p5-doc/en/html/ref-cb.html
B. Deletions, Insertions and Changes of Hand
<del type="strikeout"></del>
encloses any material that has been crossed out.
<del type="overwritten"></del>
encloses any material that has been written over.
<add type="caret"></add>
encloses any material that has been added above the line, or between lines, with a caret or other mark indicating its point of insertion in the original:
<add type="no_caret"></add>
encloses any material that’s been added, with the point of insertion not indicated (meaning you’ve have to make an educated guess about where it goes).
<note></note>
can be used to transcribe any material you find hand-written into the margin of a document, using the place attribute to indicate which margin.
<note place="marginLeft"></note>

<note place="marginRight"></note>

<note place="marginTop"></note>

<note place=""marginBottom"></note>
If the note is in the left or right margin, you should locate this element as close as possible to the place to which it corresponds in the top-to-bottom flow of the text.
<note type="authorial" place="marginTop"></note>
can also be used to record a heading that runs across the top of the page throughout a document but is separate from the flow of the text (as might occur in a diary, perhaps).
<supplied reason="omitted-in-original" cert="high">met</supplied>
can be used to add a word that you believe, according to your editorial discretion, was unintentionally omitted from the text. The reason attribute is used to provide your justification for this addition. Cert indicates your degree of certainty (valid values are low, medium, and high).
C. Representing layout/formatting of original document
When we encode documents with TEI-XML, we are concerned more with content than appearance. Indeed, one of the benefits of using XML is that it separates content from how that content will ultimately be presented. That styling is generally done with XSLT, the stylesheet/transformation language for XML (like CSS is the stylesheet language for HTML). However, we are indeed interested in recording the appearance, or formatting, of the original document itself. This is why, after all, we are using <pb/>, <lb/> and other such structural elements. Here are a few others that may be useful:
If a paragraph is indented in the original, you can indicate that through:
<p rend="indent">
(The rend attribute is used here and elsewhere to describe how things appear in the original, not how they should be rendered in any eventual output of the XML document. See http://www.tei-c.org/release/doc/tei-p5-doc/en/html/ST.html#STGAre)
<hi rend="center"></hi>
encloses centered text (see http://www.tei-c.org/release/doc/tei-p5-doc/en/html/examples-hi.html).
<hi rend="superscript"></hi>
encloses raised text.
Also…
<hi rend="italic">
and
<hi rend="underline"></hi>
If headings or labels of any sort appear in the document in all caps, please transcribe them using title case, and use the rend attribute to indicate the all caps formatting in original, as follows:
<head rend="case(allcaps)">Indigent Hospital Patients</head>
(This text appears in the original as “INDIGENT HOSPITAL PATIENTS.”)
and
<label rend="case(allcaps)">Laws and Rules</label>
(This appears in original as “LAWS AND RULES”.)
If other material appears in all caps in the original, please use the following:
<emph rend="case(allcaps)">
D. Handling gaps in the text
<gap reason="page missing from document"/>
can be used to mark a place where there is an unrecoverable gap in the original, using reason attribute to explain the circumstances. This will often have to do with damage to the original or missing pages.
If the gap is small, and you believe you can accurately deduce the missing letters or words, see IV. B. Material you add yourself below.
E. Special characters
Some characters have to be transcribed in XML with character references. These include:
° (the degree sign, as in 98° Fahrenheit) must be represented in your text as follows:
°
& (the ampersand, meaning “and”) must be represented as follows:
&
F. Openings and Closings of Letters
These elements are both structural and semantic, but we’ll put them in this section. Here are a examples of how to mark up the opening and closing of a letter:
 <opener>
    <name type="place" subtype="adddress">
       132 Main Street
       Jacksonville, FL 32207
    </place>
 <salute>
 Dear <name type="person">Miss White</name> :<lb/>
 </salute>
 </opener>
 <closer>
 <salute>
 <hi rend="center">
 <choice><sic>your</sic><corr>Your</corr></choice> sister in Christ.<lb/>
 </hi>
 </salute>
 <signed>
 <name type="person">Sarah Best</name>.<lb/>
 </signed>
 </closer>
These elements do not go inside <p> or <head> elements.
G. Envelopes
Many of the documents we are editing are letters, and images of the corresponding envelopes are included with those of the letter itself. For now, we’re going to consider an envelope a “page” in the corresponding XML document. TEI-XML P5 does not appear to contemplate this situation, so let’s just encode each address block (sender, receiver), and anything else, as a <p>, with <lb/> at the end of each line.
II. Regularizing/Modernizing
A. Abbreviations
<choice><abbr></abbr><expan></expan></choice>
can be used to simultaneously record an abbreviation and provide its resolution, as in:
<choice><abbr>1st</abbr><expan>first</expan></choice>
If the letters st in this example actually appeared in raised script in the original, we would document that as follows:
<choice><abbr>1<hi rend="superscript">st</hi></abbr><expan>first</expan></choice>
As a general rule, we will resolve all abbreviations.
B. Misspellings
<choice><sic></sic><corr></corr></choice>
can be used to simultaneously record and correct a misspelling (a misused homonym, a word spelled incorrectly, etc.):
We had some very nice <choice><sic>whether</sic><corr>weather</corr></choice> last week.
or
Lisa's dog is partly <choice><sic>Dauchshound</sic><corr>Dachshund</corr></choice>, I think.
C. Archaic/Obsolete spellings
<choice><orig></orig><reg></reg></choice>
can be used to modernize a correct, but obsolete, spelling. I am not sure we will have occasion to do so in the current project. If you encounter a case of which you’re unsure, please let me know.
D. Punctuation
We can use this sequence of elements to regularize punctuation:
removing comma:
<choice><orig>,</orig><reg/></choice>
removing period:
<choice><orig>.</orig><reg/></choice>
adding comma:
<choice><orig/><reg>,</reg></choice>
changing comma to period:
<choice><orig>,</orig><reg>.</reg></choice>
adding period:
<choice><orig/><reg>.</reg></choice>
replacing semicolon with comma:
<choice><orig>;</orig><reg>,</reg></choice>
E. Capital letters
We will respect the use of lower case/upper case letters in our transcription, but will regularize these in the edition, using
<choice><orig></orig><reg></reg></choice>
We will replace here the entire word needing a change in capitalization, not merely the individual letter or letters.
III. Encoding semantic aspects of the text
A. Dates
<date when="YYYY-MM-DD"></date>
encloses a date, however it is articulated. You might see a standard situation like the following:
She was born on <date when="1970-04-01">April 1, 1970</date>.
If you had only year, this would be the format:
<date when="1970">1970</date>
Only month and year would be:
<date when="1980-02">February 1980</date>
Only month and day won’t validate, so if that’s all you have, use “9999” as a placeholder year.
Sometimes references to dates aren’t explicit, but we can still tag them, as in:
Earlier <date when="1970">that same year</date>, her parents had moved to Florida.
B. Names
1. Individual people
<name type="person"></name>
encloses the proper name of a person, as in:
<name type="person">Nikolai Vitti</name>
This can also be used to mark common nouns or phrases that refer to a specific, identifiable person, as in:
The <name type="person">current superintendent</name> of the local public school system...
where current superintendent refers, for instance, to Nikolai Vitti.
2. Groups of people
<name type="person_group"></name>
encloses a proper noun indicating the name of a group of people that has a particular name, such as those of a given nationality or some other category. We would typically write this type of word with an initial capital, but not always. Here are some examples:
the <name type="person_group">Seminole</name> and <name type="person_group">Creek</name>
and
the <name type="person_group">British</name> and <name type="person_group">French</name>
3. Places
<name type="place"></name>
encloses the proper names of places of any type. This includes buildings, streets, cities, states (and other political divisions), as well as geographical features like rivers, lakes, etc. for example:
<name type="place">Jacksonville</name>
This can also be used to mark common nouns or phrases that refer to specific, identifiable places, as in:
the level of toxicity in the <name type="place">river</name> has increased...
where river refers, for instance, to the St. John’s.
The subtype attribute can be used to provide a more specific category for a place, as in
<name type="place" subtype="river">St. John's River</name>
and
<name type="place" subtype="city">Jacksonville</name>
Let’s handle specific street addresses as follows:
<name type="place" subtype="address">123 Main Street</name>
For places that can be located on a map, let’s include latitude and longitude as follows:
<name type="place">The Clara White Mission<location><geo>30.332632 -81.664020</geo></location></name>
To get this information, search for the place in Google Maps, right click on the location on the map and select “What’s here?”. A box will pop up showing lat. and long. If you aren’t able to copy the numbers from there, click on them, and they will appear in the search box at the left, from where you will be able to copy them.
4. Companies and organizations
<name type="company"></name>
or
<name type="organization"></name>
can be used to tag the names of such entities.
5. Events
<name type="event"></name>
can be used to indicate the name of an event, as in:
<name type="event">The World's Fair</name>
C. Titles
<title level="m"></title>
encloses the title of a monographic (“m”) work (a book, primarily).
<title level="a"></title>
encloses the title of an “analytic” (“a”) work (a journal chapter, an article, etc.)
IV. Doubts, Comments and Editorial Additions/Annotations
A. Documenting your doubts
1. <unclear>
<unclear cert="low" reason="Handwritten signature is difficult to read.">J. Henderson</unclear>
can be used to encode your uncertainty about any part of your transcription. The cert attribute indicates your level of certainty (low, medium, high), and please use reason to explain the circumstances.
2. XML comments
<!-- -->
is the format for an XML comment, which can be used anywhere to add additional documentation.
<!-- text here -->
can be used to insert comments into your XML file. This is metadata that will not display in the output of your file. You can use comments of this sort to record doubts or questions you might want to follow up on later.
B. Material you add yourself
<supplied reason="text smudged" cert="medium"></supplied>
can be used to supply letters or words that can’t be read. Use reason attribute to give a text explanation for the circumstances, and the cert attribute to indicate your degree of certainty about the solution you’ve provided (the acceptable values are high, medium, and low).